Salesforce Flow is an extremely powerful feature, the most powerful within any Salesforce Admin’s arsenal. It’s a point-and-click configuration tool that grants Admins the ability to integrate complex business logic into Salesforce without having to write a single line of code.

In this article, we’re going to discuss five different Salesforce Flow ideas that can be created in a very short amount of time and can be used to benefit your Salesforce org dramatically. It is strongly suggested as best practice that you build this out in a Sandbox or Developer Org as opposed to Production. Building anything directly in Production can cause issues if you’re not careful.
If you want to learn more about Salesforce Flows as well as Top 10 Best Practices for using them, check out our Ultimate Guide to Salesforce Flows.
Idea #1: Standardize Opportunity Naming
Requirement: Opportunities are being created with all sorts of different naming conventions, and you, as the admin, have been tasked to clean them up and keep them aligned going forward.
Solution: You can create a Salesforce Flow that grabs the name of the Account, the Type field, and the Stage field from the Opportunity and strings them together to create a naming convention for all Opportunities going forward.
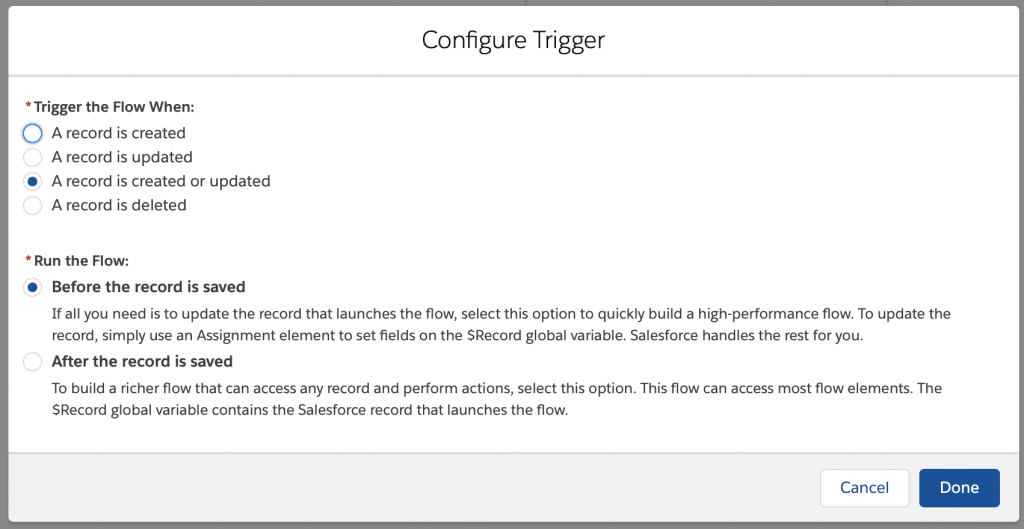
Firstly, you’ll need to create a new Record-Triggered Salesforce Flow that runs every time the record is created or updated, and runs before the transaction.
Next, you need to create a new Resource. This will be a Formula called oppNameFormula, and the formula itself will be:
{!$Record.Account.Name} & " - " & TEXT({!$Record.Type}) & " - " &
TEXT({!$Record.StageName})
See below for the completed Formula Resource.
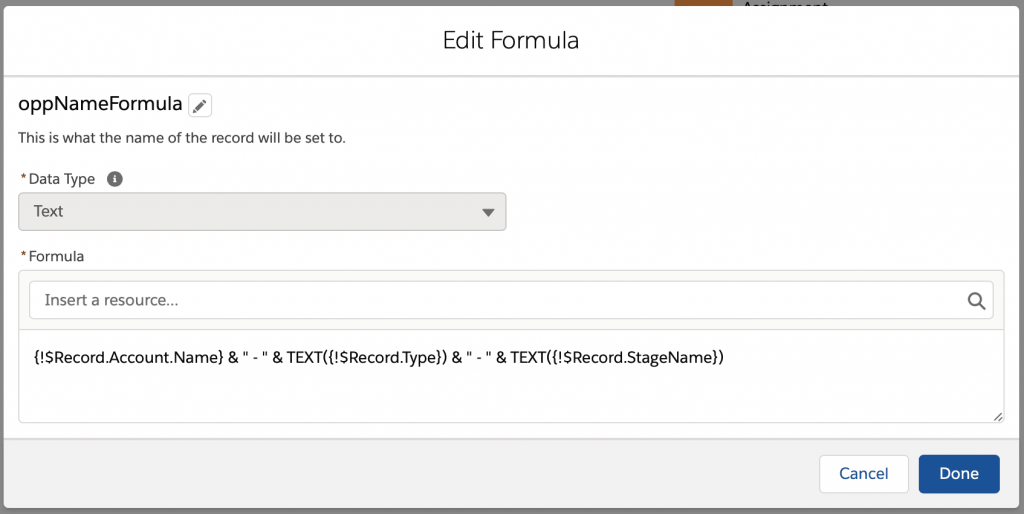
Note: The formula assumes there will ALWAYS be an associated Account, Type, and StageName value on the Opportunity. You may need to use Validation Rules to enforce this, or use IF logic to accommodate for edge cases where these values are not populated.
Finally, you need to assign the oppNameFormula to the Opportunity Name field. Simply drag in an Assignment element and populate it as follows.
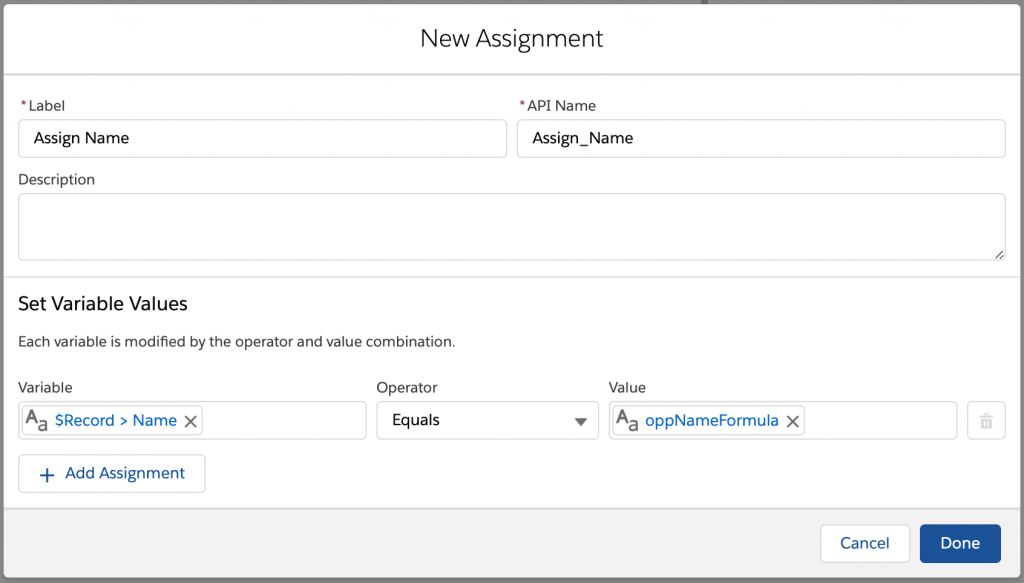
Save your Salesforce Flow for Automatic Opportunity Naming and activate it. To test this Salesforce Flow, create a new Opportunity record and ensure the Account, Type, and Stage fields are populated. When creating your record, ensure the Name value is set to something that doesn’t line up with the naming convention when you create it. After you’ve saved the record, the name should have updated to align with the naming convention.
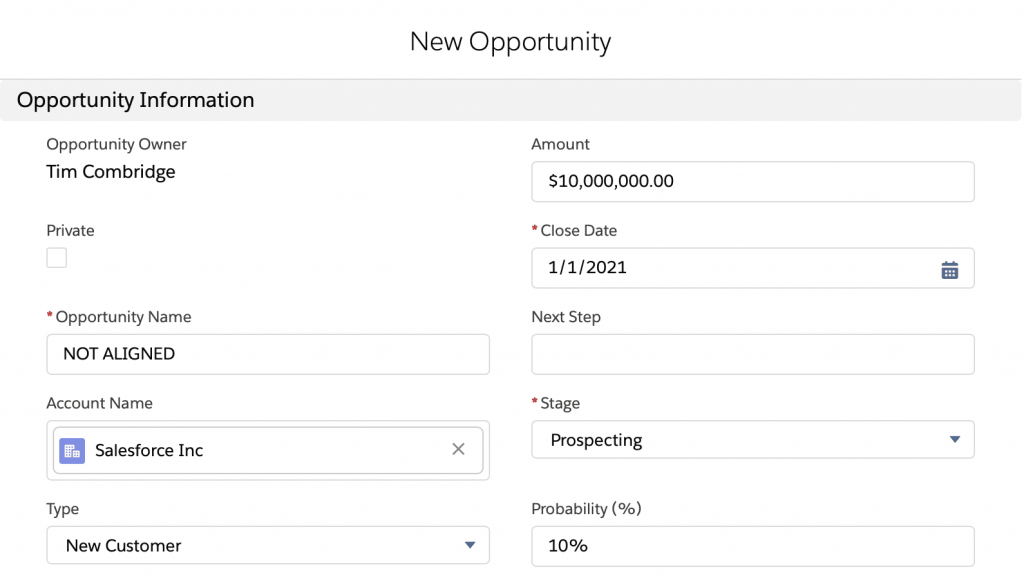

This kind of Salesforce Flow can be used on any object within Salesforce, depending on the type of name you want to give those records. All Cases could have a uniform Subject field, Campaign records could be automatically named based on where they sit in a hierarchy, etc.
Idea #2: Salesforce Flow to Quickly Create a Child Contact Record
Requirement: Service team members are getting phone calls from existing client businesses, but the people that call are often not recorded in Salesforce. Some team members create new Leads, some take handwritten notes and forget to enter them into the system, and some log the notes against a different Contact under the same Account – all because it’s too time consuming to create a new Contact record on the go.
Solution: Give them a Screen Flow that makes creating Contact records on the fly a breeze.
Create a new Screen Flow and place a Screen element on it. Add 4 fields as below.
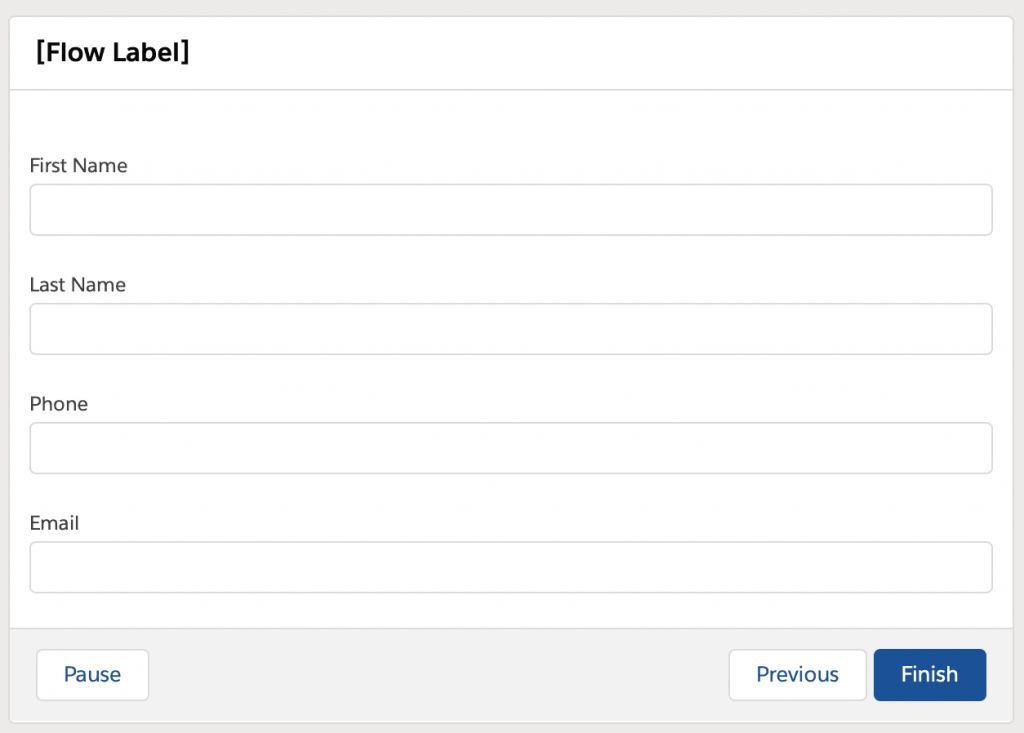
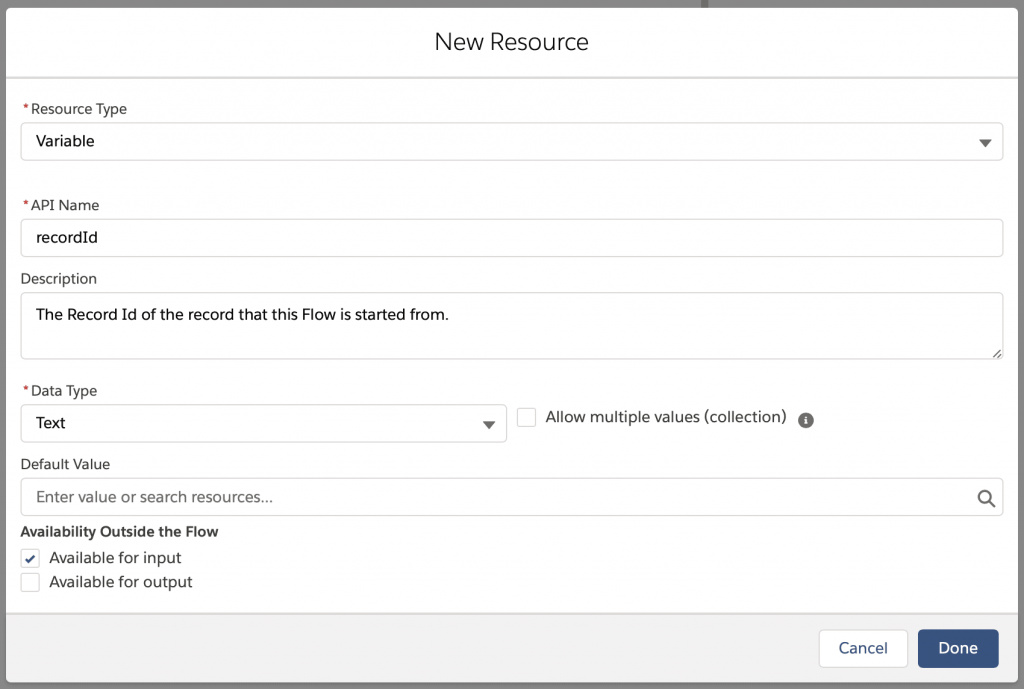
Next, you need to grab the Id of the Account record that you’ll start the Salesforce Flow from. To do this, you want to create a New Resource and call it recordId. Be sure to allow for input. See the screenshot below for more information.
Once you’ve saved the recordId resource, it’s time to insert your record. Add a Create Records element onto the Canvas after your Screen element and set the Fields section to ‘Use separate resources, and literal values’. This is where you’ll map the recordId to the lookup field (in this case, the AccountId field) and map the screen values to the fields on your new record. See the example below.
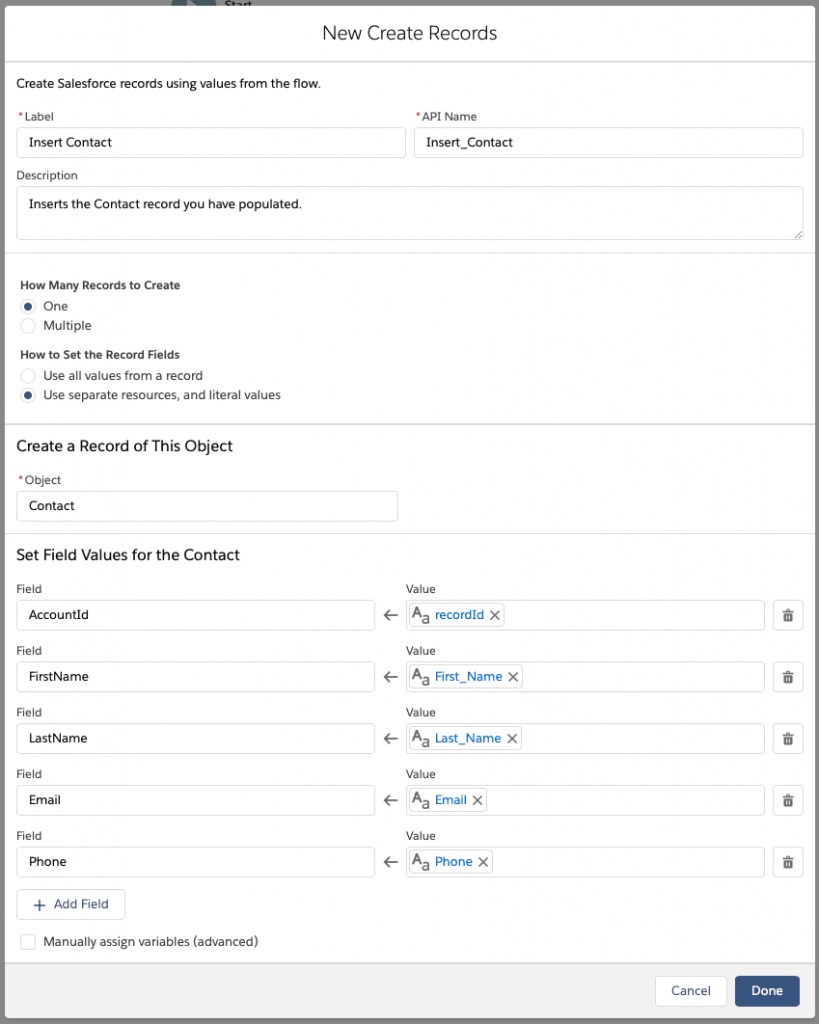
That’s it! You could add a Screen to let the user know their record is created, or use a custom Action to redirect your user to their newly created record, but sometimes it’s best to keep it simple!
Now all that’s left is to create an Action on the Account object that calls this Flow for Creating a Child Contact Record, and you’re done! The Record Id will automatically be passed into the recordId variable.
Idea #3: Salesforce Flow to Redirect to Record Custom Action
Requirement: Your Salesforce Flow creates a new record, and you want to redirect your users to the newly created record rather than sending them back to the page that they called their Salesforce Flow from.
Solution: Create a simple Lightning Component that will redirect your users to a record based on Id, and pass the newly created Record Id into the Component.
This one is a little more technical, but is a simple solution that can have a big impact on your Salesforce Flows. We’ll be creating a Custom Lightning Component, but the markup is all copy-and-paste so there’s nothing too scary!
The first thing you’ll need to do is open Developer Console, and create a new Lightning Component.

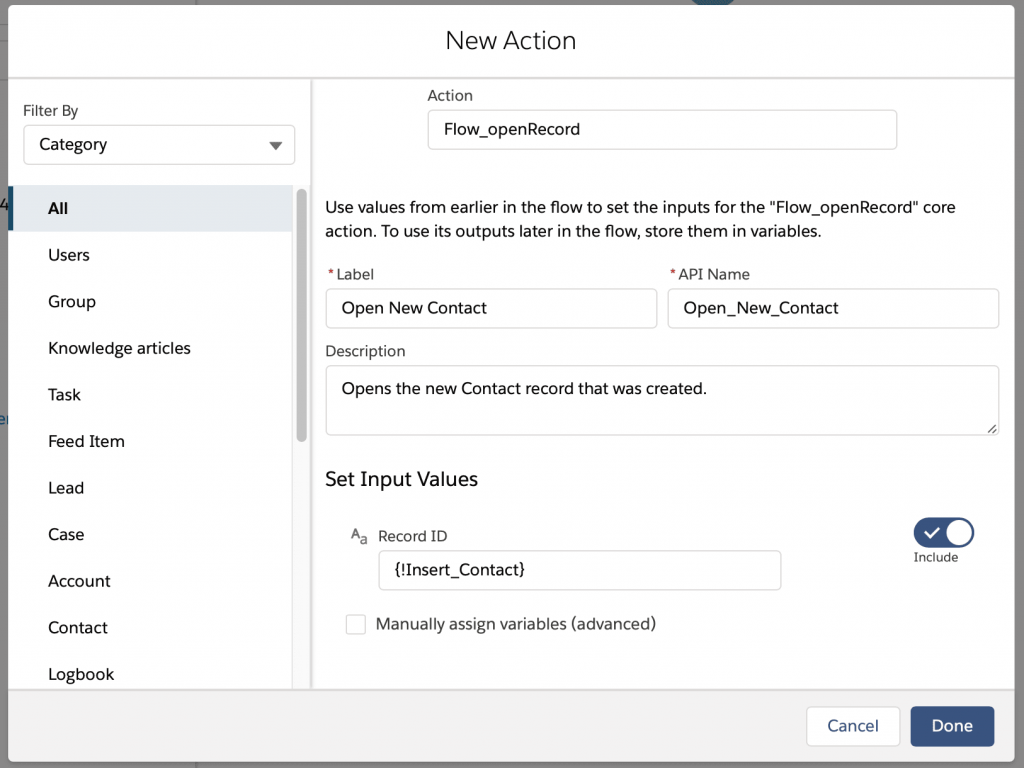
We called ours ‘Flow_openRecord’ because it fits in with our existing naming convention, but the name doesn’t matter too much. Click Submit, and don’t check any of the Component Configuration boxes.
Inside your Lightning component, you’ll need to click on each of the following to create the files: Component, Design, and Controller.
In the Component file, replace the content with the following:
<aura:component implements="force:lightningQuickAction,
lightning:availableForFlowActions">

   <aura:attribute name="recordId" type="String" />

</aura:component>

Save your Component file. Open the Design file, and replace the content with the following:

<design:component>

   <design:attribute name="recordId" label="Record ID" />

</design:component>
Save your Design file. Open the Controller file and replace with the following:
({    invoke : function(component, event, helper) {

   // Get the record ID attribute

   var record = component.get("v.recordId");

   // Get the Lightning event that opens a record in a new tab

   var redirect = $A.get("e.force:navigateToSObject");

   // Pass the record ID to the event

   redirect.setParams({

      "recordId": record

   });

   // Open the record

   redirect.fire();

}})
Save your Controller file, and you’re done! Yep, that easy!
To use your new Custom Action, you’ll need to drag an Action element into a Screen Flow and search for the name of your Component (once again, we called ours ‘Flow_openRecord’). Specify the Record Id that you want to navigate to, and you’re done!
Idea #4: Salesforce Flow to Automatically Create Projects from Opportunities
Requirement: It’s a common scenario that companies need to create a Project (for example, for customer onboarding) from a template when an Opportunity is set to Closed Won. This takes a considerable amount of time and manual effort to do for every Won Opportunity. Doing all of this manually also leaves significant room for human error or for someone to simply forget or delay a step.
Solution: Your company is likely to be using Inspire Planner – one of the most popular native Project Management apps for Salesforce. Now we’re going to create a Salesforce Flow that automatically creates a new Project from a specific Template when the Opportunity is set to Closed Won. This new Project will include all the tasks, predecessors, documents, resources roles, and more from the Template.
Firstly, we want to specify the Project Template that will generate for the Opportunity after it has progressed to Closed Won. To do this, we’ll add a new Project Template lookup field on the Opportunity Object. This will be a Lookup field to the Project object.

To ensure we only allow templated Projects in the lookup field, we’re also going to add Lookup Filter Criteria to the field. This ensures the User can’t accidentally add a non-templated Project in the field by accident.

Finally, you’ll want to add a Validation Rule to ensure that a Project Template is added before marking the Opportunity as Won. There are a few ways to do this, you’ll need to define it properly within your org, but the below screenshot shows a simple way of doing it.

Now that you’ve got your Project Template field setup and ready to go, it’s time to automate the creation of the Project in Inspire Planner. To do this, we’ll use a Record-Triggered Salesforce Flow. Once again, there’s a number of ways to do this, but we’ll create a single Salesforce Flow to handle the operation.
Navigate to Flows in Setup. Create a new Salesforce Flow, select Record-Triggered Flow, and select Auto-Layout. Then click the Start Element to configure it for Opportunities where the Stage has been changed to Closed Won.
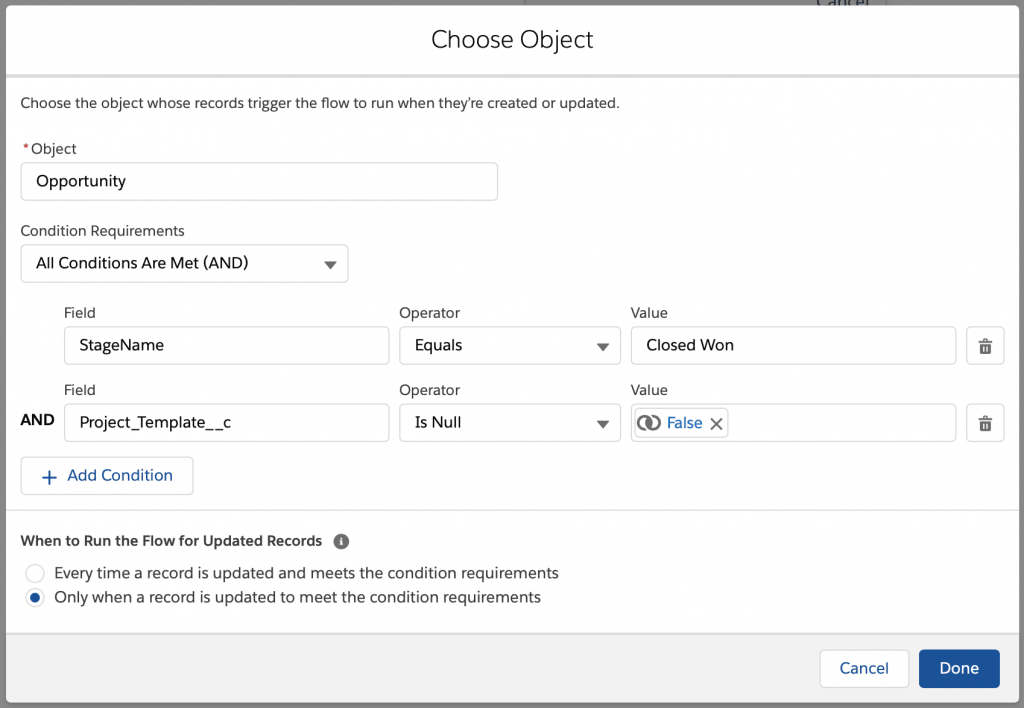
Don’t forget to mark ‘Only when a record is updated to meet the condition requirements’ – this will ensure it only fires when the Opportunity Stage is updated, not every time it’s edited afterwards.
Next, click the + icon underneath the Start Element and add a Create Records Element. Configure it as below.
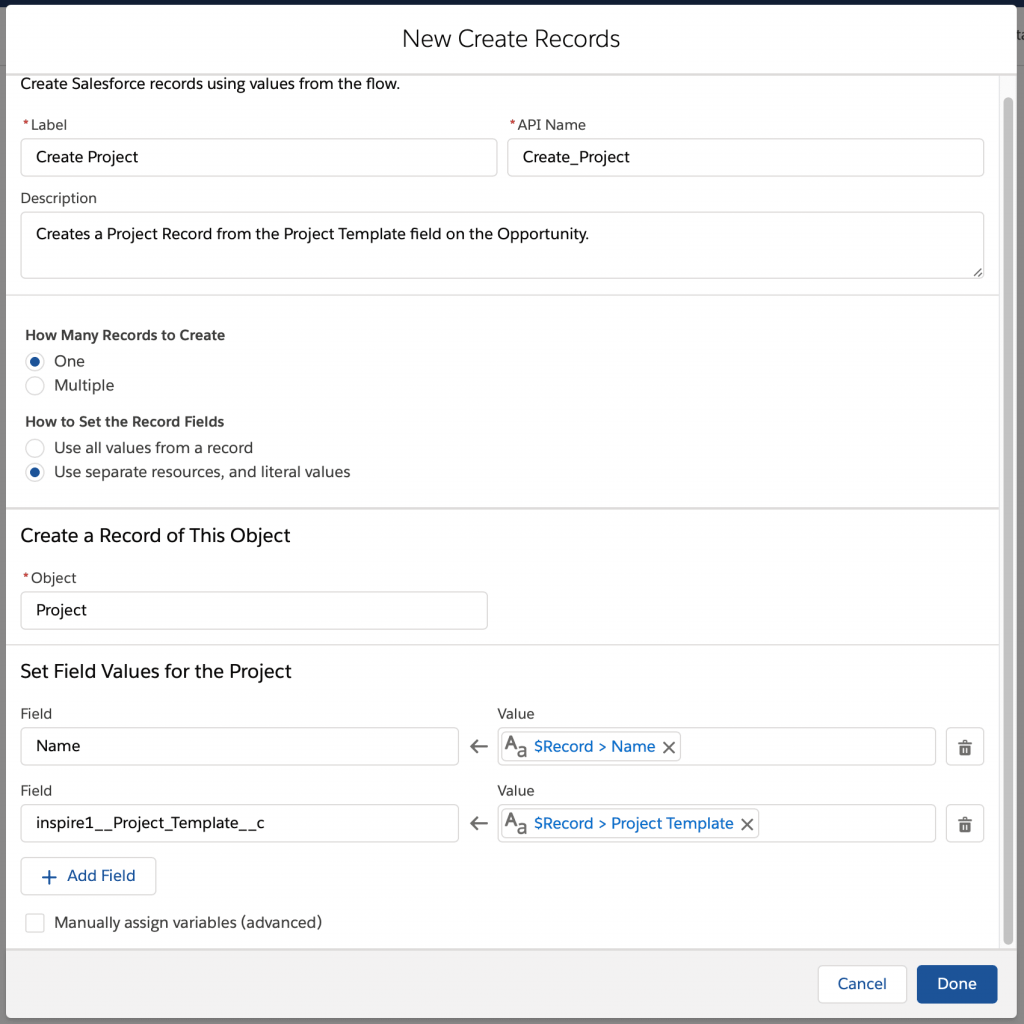
What we’re doing in this step is saying that we want to create a new Inspire Planner Project with the same name as your Opportunity record, and we’re giving it a Project Template value from the Project Template field you created on your Opportunity. From there, Inspire Planner will see the value of a newly created Project and will build it out with all the Tasks from the Template, predefined predecessors, pre-attached documents, assigned resource roles, allocated effort, and more. Pretty neat!
That’s it! This Salesforce Flow is so quick and easy to create, yet it will save copious amounts of time for your team. This is just one way that Salesforce Flow can be used to automate business processes within Salesforce and Inspire Planner.

Idea #5: Migrate Process Builder into Salesforce Flow
Requirement: Your org has a lot of Processes, and a lot of Flows. You want to have one place to view all of your declarative automations when it comes time to debug, rather than having to sieve through two different tools and two different menus.
Solution: Manually rebuild your Processes as Salesforce Flows. This will ensure there’s only one place to look for all your declarative automations.
It’s likely that you’re following best practice inside of Process Builder and have a single Process for each object. It’s also likely that you’ve noticed Salesforce Flow inheriting and surpassing a lot of the functionality that Process Builder has.
This idea is one that you should take with a grain of salt, and only apply after carefully assessing your org and the impacts that rebuilding everything into Salesforce Flow may carry. The end result is that you’ll have one tool to use for any declarative automations, and only one place to look when there’s an issue (excluding Apex issues).
Salesforce has been enhancing Flow more and more in recent releases, including adding features that were previously Process Builder exclusive. Have a read of this article to see 10 of the new Salesforce Flow features being added in the Spring ‘21 release alone.
Additional Resources on Salesforce Flows
If you are trying to learn more about Salesforce Flows, here are some great resources for you:
- Inspire Planner guide on Salesforce Flow
- Salesforce Flows – Learn Salesforce Lightning Flows Fast
- Salesforce Flows: The Complete Guide to Lightning Flows
- Salesforce Lightning Flows
- Ultimate Salesforce Flow Foundation Course
Summary
These are just a number of ways that Salesforce Flows can be used to quickly and effectively enhance your Salesforce org. With only a few clicks on a simple interface, a Salesforce Admin can align the system with the priorities of the business.
Salesforce Flow is the most powerful declarative tool an Admin has. If you’re starting out your Admin journey and still learning the ropes, make sure you invest some time learning how to build Salesforce Flows properly – you won’t regret it.


