How to Get Started With Salesforce Notification Builder
Salesforce
How many times have you wished that communication within your Salesforce org was much easier? How many times have you heard the Sales reps in your company complain about not receiving an important update that could have helped their deals? Do the users in your Org often complain about receiving notifications that aren’t relevant to them? If you could check on any of the questions mentioned above, we have good news for you. Salesforce has introduced a cool new feature called “Notification Builder” as part of this year’s Salesforce Summer’19 release.
Salesforce Notification Builder enables admins to create customized in-app notifications for the targeted audience. You can define when you want the notification to trigger, what message to display and which users to notify. And you can do all of this in just a few clicks.
While the option to create notifications has been available for Salesforce admins for a long time, it was limited to creating standard notifications from predefined use cases. With the Summer ’19 release, that barrier has been removed. Admins can now create in-app notifications using standard and even custom objects in Process Builder. You read that right – you can now create targeted notifications quickly without making any customization efforts.
How To Create a Notification in a Salesforce Notification Builder
Here’s a simple 4-step process to create a notification in a Salesforce Notification Builder:
- Create Notification Type: Go to Setup → Notification Builder → Notification Types. Create a new Notification type. You can choose the notification to support both Desktop and mobile.
- Create a Process and define entry object: Go to Setup → Process Builder and create a new process. You can define the entry event on a standard or custom object and choose when the process should lookup this object.
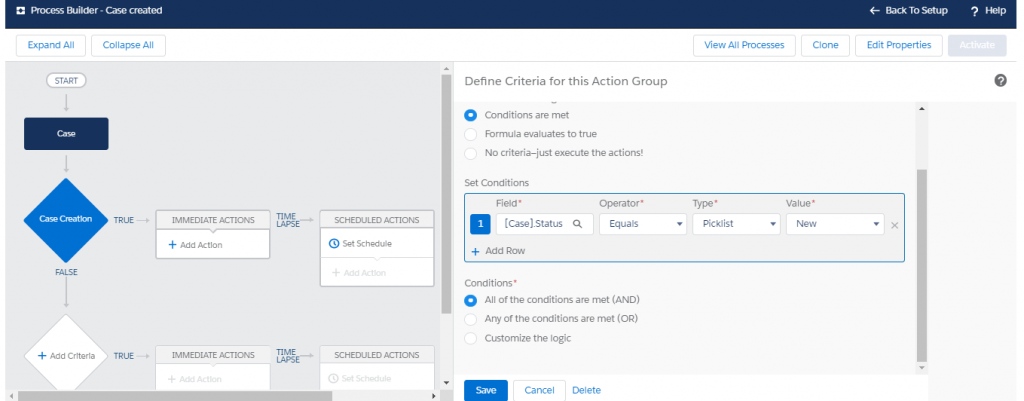
- Create a trigger condition: Next step is to define the trigger for notification. You can define a condition for field values on the object or when a formula evaluates to a certain value. Alternatively, you can simply have the notifications triggered on object creation/update without any criteria.
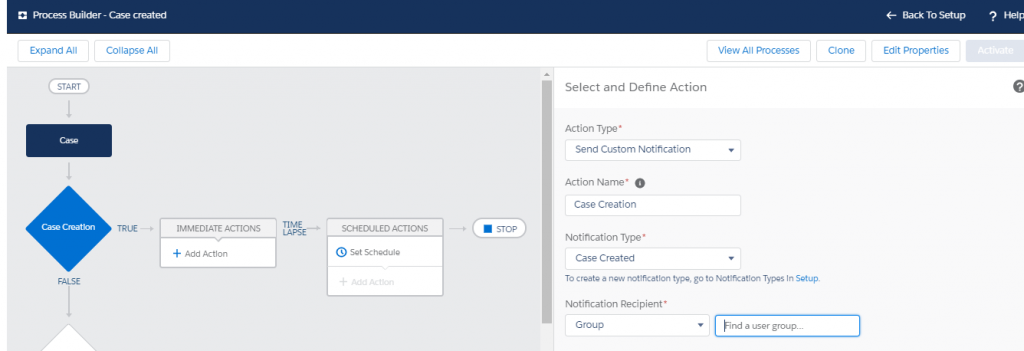
- Design the Notification: Now that we have defined the trigger point, it’s time to shoot. But before that, you must define what your notification would tell and more importantly who to send the notification to. To answer the latter point, select Add Actions | Action Type | Send Custom Notification. Enter a value to the Action Name field and select the notification type from Step 1. The admins can make sure that notification is sent to relevant users only by selecting the Users, Owner, Group or queue that will receive this notification.
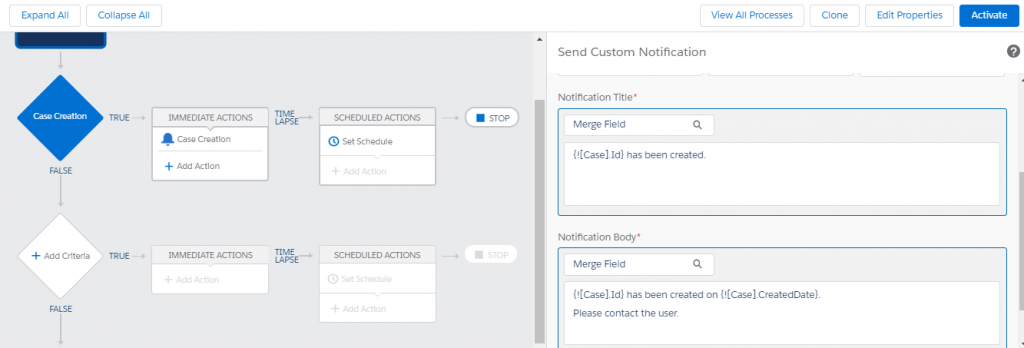
Once you define the notification type and target audience, the final step (also the jazziest step) is to design the notification content. Depending on the purpose and criticality of the notification, admin can design the title and content. Admins can also create dynamic notifications by merging field values.
You can add further condition and action item. For example, you want to notify the opportunity team of a deal that the deal is closed but may also want to create a new Order record linked to the opportunity.
If you want to stop at just notifying the users, then congratulations! You are ready with your latest notification for the users that is much friendly, more relevant and surely didn’t take hours of effort. So, enjoy this latest feature while you make sure your users get the notification they need, at times when they need it the most.


