Salesforce Approval Process: Simpler Config Than You Think
Salesforce
As you continue working in Salesforce and get a feel for building simple configurations, don’t be afraid to tackle building an approval process. Approval processes are used all over the place in different companies for different important reasons, so why should Salesforce be any different? Before you think Approvals in Salesforce are too advanced for you, take a look at the outline we’ve created below. Building an approval process is not as challenging as you think, and they can truly make a difference in the way your company handles approvals. If you have any kind of item that may need to be approved, you should consider building the Salesforce approval process.
A Relatable Example of a Salesforce Approval Process
Let’s say your company wants managers to approve of all high-value deals. This makes sense as high-value deals are important and upper management should have their eyes on them to assist in making the deal happen! A manager may need to look at the deal to confirm that all of the information is accurate and there has been adequate communication with the team members or client involved on the deal.
In Salesforce, using Opportunities to manage deals, you can create an approval process where once a high-value deal reaches a specific Stage, managers have to approve of the Opportunity record before any further actions or edits can take place related to that record. Let’s say that in this case, a high-value deal is one that has an Opportunity Amount of over $20,000. Let’s also say that once an Opportunity has reached the Stage “Proposal/Price Quote”, the Opportunity is starting to get serious enough that it’s time for a manager to check the information and communication related to it. We can set up our approval processes with these criteria easily. Let’s get started:
Use The Wizard!
The first decision you have to make regarding Approval Process setup is to choose the right wizard to use. In this case, we are going to use the JumpStart Wizard. With this wizard, some default options are already selected for you, making it a simpler and easier tool to get started with. In the future, when you need to create more complex approval processes, try using the Standard Wizard.
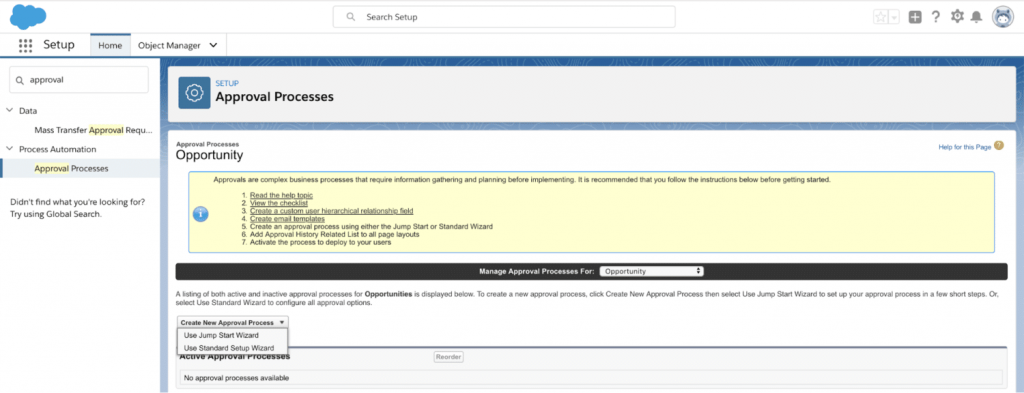
Picture Credit: Salesforce
After selecting the Jump Start Wizard, you are prompting to Name your approval process. Remember to pick a name that is concise and explains what your approval process does. The Unique Name will auto-populate when you enter the Name. The Unique Name is the API name of the approval process, or how you will recognize it when creating change sets or referencing it in custom Apex code. We’ve named ours, “Managers Must Approve High-Value Opptys”.
If you want a button to appear on records that says “Submit for Approval”, then check the “Add the Submit for Approval button and Approval History related list to all Opportunity page layouts” box. We will do this in our case.
Approval Assignment Email Templates define the email that the approver will receive when a record is submitted for approval. In this case, the User who is informed that a record needs their approval is the Manager of the Opportunity record owner. You can create a custom email template to use here, or if you leave this field blank, an automatic approver email will be sent to the approver notifying them that the record needs approval.

Picture Credit: Salesforce
Next, we want to fill out the criteria for a record to actually enter the approval process. This relates back to our scenario: We want Opportunities to qualify for the approval process when the Opportunity Stage is “Proposal/Price Quote” and when the Opportunity Amount is greater than $20,000.

Picture Credit: Salesforce
To keep things simple, we will set the approval process to Automatically assign an approver using a standard or custom hierarchy field: Manager. This way an Opportunity record Owner’s “Manager” is the User who will approve any Opportunity submitted for approval by the owner.

Picture Credit: Salesforce
Upon clicking Save, you have created a single step approval process! However, it is not ready to be used yet. Although it is not required to do so, Salesforce recommends that you add other steps to your approval process to ensure that it is working properly and takes all sorts of approval cases into account.
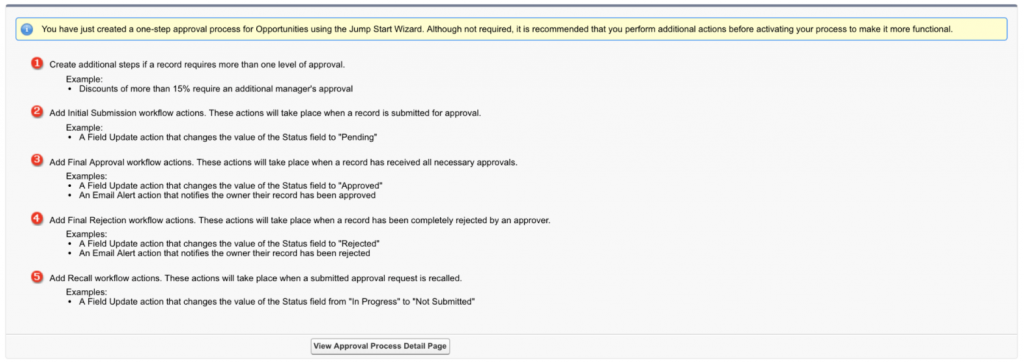
Picture Credit: Salesforce
You can add these next steps in the Salesforce Approval Process Detail page. This includes adding steps to create multi-step approval processes, what should happen when a record reaches the final step of the approval process and is rejected, and more. These steps are more advanced but you should still take a look at them to see if any are needed in your approval process.
You’re Almost Ready To Start Using Salesforce Approval Process
Finally, you should conduct careful testing to ensure that the approval process is working as expected. This includes testing to ensure that the approval process emails are getting sent as well. To make testing emails easier, you should create and submit Opportunities for approval as a single User, then log into that single User’s Manager to submit or reject the record in the approval process. Another tip is to change the Manager’s email in their User page to your own email address so you can ensure that the emails are getting sent. Remember to always build new config in a Sandbox org – you wouldn’t want to change the email address of an actual User in Production!