5 Things You Need to Know Before Using Salesforce Leads
Salesforce
Today, many companies use Salesforce Leads to track their potential customers, see how well their marketing campaigns are working, and try to increase overall sales. Managing Leads in Salesforce is not only simple to do but also very beneficial since Salesforce tracks everything. Managing Leads in Salesforce utilizes the tons of Lead data generated and lets you report on this data, providing visibility into your Lead processes to further drive decisions. In Salesforce, there are many features you can use to make this entire process quicker, automated, easier, and more successful overall. However, there are 5 things that you need to know before using Salesforce Leads if you want to have effective Lead management and increase sales.
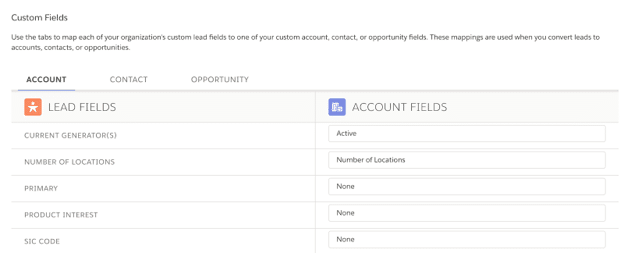
1. Map Custom Fields for Salesforce Leads Or Lose Your Data
When you create a custom field, you must map it to another field on Accounts, Opportunities, Contacts, or a combination to ensure that your data is not lost upon Lead conversion. What this means is that you must match a field from Accounts, Opportunities, Contacts, or a combination of those to match the custom field on your Lead. Then, upon Lead conversion, the value is saved in this new field. For example, you may have a custom Lead field called “Number of Children”. If you want to capture this information on Accounts, you will have to specifically match the Lead field to an Account field, called mapping. It’s a simple process, but if you forget to map the fields, you will lose this information when the Lead is converted.
2. Change Salesforce Leads Status Values to Fit Your Company’s Needs
Lead Status is a picklist field like any other. This means that you can edit, delete, and add new picklist values to the existing list. You can also specify a default value for when a Lead is created for the first time. Customize your Lead Status values to match your Lead Process: If a Lead must go through a “Nurturing” stage before it can be ready to convert, add “Nurturing” as a Lead Status picklist value, and adjust the stage order as necessary. You can take it one step further to use Validation Rules to ensure certain information is recorded on the fields on your Leads before Users can change the Lead Status. You can learn more about this below.
3. Use Validation Rules to Keep Lead Data Clean
Validation Rules are a great way to make sure Users don’t try to qualify Leads that are missing information. They actually improve the User experience by letting Users know what information is missing and are easy to setup too. Validation Rules work by preventing a record from saving if specified criteria are met. First, you must determine what information a Lead must have before its status can be updated. Then, create your rule to enforce that! For example, you can have a Validation Rule prevent a User from changing a Lead’s Status to “Ready for Conversion” if the “Company” field has not yet been populated. Just be sure to write a helpful “Error” message for the rule so it’s clear to Users what information they need to add.
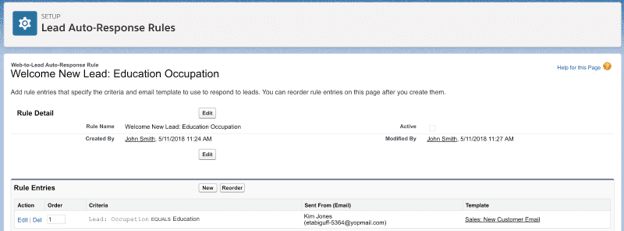
4. Use Auto-Response Rules to Quickly Email All New Salesforce Leads
To automatically respond to all new Leads that enter Salesforce from your company’s website, use Auto-Response Rules. Auto-Response Rules are an easy way to automatically send emails to any new Lead that enters Salesforce that also meets a criteria. They are easy to set up and you can have multiple rules. This is very useful if you want to send different email messages to Leads based on different criteria. For example, if you have different responses for Leads based on their occupation, you can write multiple rules to reflect this. All you have to do is specify a criteria, such as Occupation being “Education”, then associate the appropriate email template.
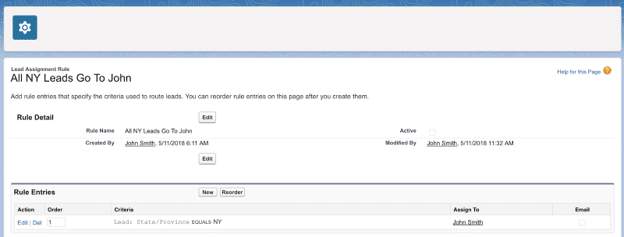
5. Use Lead Assignment Rules to Assign Leads to Users Automatically
Another feature that is easier to setup than it may sound is Lead Assignment Rules. Lead Assignment Rules are used so that when Lead meets specific criteria, it is automatically assigned to a specific User or Queue. You may use this feature if you have multiple departments or teams who should handle a specific type of Lead. For example, if your company was a regional company that handled Leads based on location, you may want all Leads from NY, or New York, to go directly to one specific User. You can set this up for multiple regions and ensure that all new Leads are directed to the right person. With Lead Assignment Rules, all Leads will have an owner who is assigned to that Lead for a specific purpose. This helps you have better Lead management as Lead owners will know exactly how to nurture that Lead into a customer, increasing sales for your company overall!
Looking for more ways to effectively manage Salesforce Leads? Then check out the following Lead Management guide from Salesforce itself!